Repetitive strain injury in the wrist area is quite common, and can cause pain, numbness and tingling, aching, weakness, and decreased coordination. Carpal tunnel syndrome is one type of repetitive wrist injury. This relaxation exercise will help reduce the symptoms and relieve pain caused by repetitive strain conditions of the wrist.
Even if you do not have any issues with wrist strain or injury, you may find that these techniques are helpful to allow your hands and arms to be more relaxed and to prevent repetitive strain injuries. You can use these exercises as a break if you are doing repetitive activities with your hands, such as typing, or just to relax any time at home or at work.
Here is a bit of background information that relates to some of the exercises we will be doing. The bones in your wrist are called “carpal” bones. The space between these bones where your nerves pass on their way to the hands is called the “carpal tunnel.” In repetitive strain injury such as carpal tunnel syndrome, or CTS, the nerves can get pinched. The exercises we will go through can help move the tendons and nerves through the carpal tunnel to allow them to move more freely and smoothly and to reduce the pressure on the nerves so they are no longer pinched. Repetitive strain injury is often characterized by reduced movement of the nerves through the carpal tunnel, so we will do some tendon gliding exercises that can help get the tendons and nerves moving again.
Most people need a visual cue, and not just the verbal description of what to do. If you find a visual cue is helpful to follow the movements, you can follow along with the pictures and video instructions for this exercise on this page (innerhealthstudio.com/straininjury).
Begin this relaxation exercise by getting comfortable and sitting in a relaxed position where your arms are supported – for example, by sitting in a chair with wide arms or sitting cross-legged on a mat on the floor with your hands resting on your legs. Avoid small pressure points on the arms or wrists (such as a chair with small, narrow arms) or having your arms dangle. The exercises in this relaxation script will be easiest if you are seated rather than lying down.
Please find a comfortable position while I talk about some precautions for these exercises. Please note that there will be some gentle stretches, exercises, and self-massage for the hands, wrists, arms, and neck. Make sure to do each movement gently, and do not do any movements that cause pain. If the exercises are uncomfortable, stop, do them even more gently or with less range of movement, or take a break so that you do not worsen your symptoms by overdoing it. If you aren’t sure what movements are okay for you, check with a medical professional such as an occupational therapist, physical therapist, or physician. Even if you have done these exercises before, listen to your body each and every time you do them, and stop if you have concerns or if any new symptoms develop at any time. And of course, consult a medical professional if you have any concerns or if you aren’t sure what to do.
Once you have settled into a comfortable position with your arms and hands supported, let’s focus on starting to relax.
Start by breathing slowly and deliberately, to get your breathing into an even, smooth rhythm. Breathe in…and out…
In…out…
Breathe in…breathe out…
In…out…
Keep breathing slowly like this, letting the slow breaths calm and relax you. Let your breathing settle into a comfortable rhythm.
Concentrate on your shoulders for a moment. Gently raise your shoulders toward your ears. Hold this position as you remember to keep breathing. Now release, letting your shoulders drop and become limp. Let any tension leave your shoulders as you relax the muscles there.
If tension remains, repeat the movement. Raise your shoulders. Hold…breathe in as you continue to hold the position, and then release the breath as you release your shoulders. Let them go limp and relax into a lowered position.
Repeat one more time. Raise your shoulders. Hold…breathe in…and relax. Relax your shoulders as you release the breath. Continue to breathe. Let the tension leave your shoulders as you release each breath. Leaving only relaxation…loose and relaxed.
Focus now on your neck. Look up toward the ceiling just until you feel a slight stretch on the front of your neck, and hold this position while you breathe in. As you exhale, return your head and neck into a neutral position, looking forward.
Repeat this movement, looking up…and then returning your head and neck to neutral.
Now turn your head to the right so your chin is above your right collarbone, about one third of the way to your shoulder. Now gently lean your left ear toward your chest until you feel a slight stretch on the back right side of your neck. Just let the weight of your head create the stretch as gravity pulls downward. Don’t exert any force with your muscles. Just let all the muscles relax. Hold the stretch. Raise your head again, but keep your head turned to the right and your chin above your right collarbone.
Repeat the stretch, allowing gravity to move your left ear gently toward your chest until you feel a slight stretch. Hold. And return your head to an upright position.
Keeping your chin above your right collarbone, gently lean your right ear toward the back of your right shoulder, until you feel a slight stretch on the left side and front of your neck. Return your head to an upright position, keeping turned to the right.
Repeat, gently leaning your right ear toward the back of your right shoulder until you feel a gentle stretch. Hold…and now release. Return to neutral with your head upright and facing forward.
Now turn to the left, about a third of the way to your shoulder, so your chin is above your left collarbone. Gently stretch the back left side of your neck by allowing gravity to bring your right ear toward your chest. Hold…and return your head to an upright position. Keep looking to the left.
Repeat this gentle stretch, leaning your right ear toward your chest. Relax all the muscles as the weight of your head causes the stretch. Now release, returning your head to an upright position, while still keeping your chin above your left collarbone.
Gently ease your left ear back toward your left shoulder, stretching the right side and front of your neck. Hold…and return to neutral.
Repeat, moving your left ear toward the back of your left shoulder. Hold the stretch…and return to neutral. Face forward now.
Now lean your head gently forward. Relax all the muscles, and allow the weight of your head to hang down and gently stretch the muscles on the back of your neck. Let the muscles relax completely, requiring no force from you.
Raise your head to a neutral, upright position. Roll your shoulders forward…keep rolling them slowly…remember to breathe smooth, even breaths. Now change directions, and roll your shoulders back, very slowly. Roll them a few more times…and relax. Let your shoulders be still. Lower them into a neutral, relaxed position.
Breathe.
Now reach up with your hands above your head, stretching your arms and hands. Stretch your shoulders and back as you reach as high as you can. Breathe in. Now lower your arms to the sides, stretching them wide as you exhale. Bring your arms right down to your sides, and then reach up again as you breathe in…then out to the sides and down as you breathe out.
Repeat this stretch a few more times, on pace with your breaths. Reach up as you breathe in, and reach out to the sides and lower your arms as you breathe out.
(Pause)
Now let all your muscles relax. Rest your arms on your lap or at your sides, supporting your arms so they are not dangling. Let all the muscles of your body relax and go limp…only keeping just enough muscle tone to keep you supported and upright…but otherwise completely loose.
If you notice any tense areas in your body, concentrate on these areas while consciously allowing the muscles to let go and relax. Breathe slowly, and calmly, becoming more relaxed and restful with every breath you take.
You may notice your whole body settle in and relax with every breath out.
Continue to breathe evenly and smoothly.
(Pause)
Now that you have started to release some tension, we can focus on reducing the repetitive strain injury symptoms with some gentle exercises.
First, rub your hands together to create friction and warmth, and to improve blood flow. Place your palms together and move your hands in small circles in opposite directions. Keep rubbing them together as you continue to breathe.
Now use the palm of your right hand to rub the back of your left hand. Warm up the back of your left hand. Move to your left wrist. Rub the back of your left wrist and your left arm, all the way to your elbow. Warm up the back of your left arm, hand and wrist.
Now move to the front of your left arm and wrist, moving your right palm from your elbow, to your wrist, to your hand, and back to your elbow.
Gently massage the muscles of your left forearm by moving your right thumb in small circles while you cradle your left forearm in your right hand. Start near your elbow. Be gentle. Massage the front, sides, and back of your arm. Use your right thumb and fingers to massage the muscles of your arm and allow them to relax. Apply just the right amount of pressure to allow the muscles to feel warm and to release tension. This relaxation is the objective here.
Slowly move toward your wrist, massaging smoothly and gently to relax your entire left forearm.
Pay special attention to your wrist, gently massaging the front of your wrist while your wrist remains in a comfortable, neutral position…and then gently massaging the back of your left wrist while it continues to be in a neutral, relaxed position.
Let’s give that right hand a break. Let both arms and hands rest for a few moments. Just relax…calm and still.
(Pause)
Now rub your palms together again to warm them up. Then proceed to the back of your right hand…and the back of your right arm. Rub the palm of your left hand from your right elbow to your right wrist and hand. Then move to the front of your right arm and do the same…warming up the muscles and allowing them to relax.
When your right arm and hand are warm, rest your right arm in your left hand, starting at the right elbow, and massage the muscles of your right arm by moving your thumb in gentle circles. Concentrate on the muscles on the front of your right arm…and the back of your right arm. Remember the sides of your arm as well.
Slowly move toward the right wrist, massaging all the muscles using the thumb, palm, and fingers of your left hand.
Pay special attention to your wrist, gently massaging the front of your wrist while your wrist remains in a comfortable, neutral position…and then gently massaging the back of your left wrist while it continues to be in a neutral, relaxed position.
Now let both arms rest again…relaxing your arms.
More self-massage for the hands and wrists will follow, but first, let’s do some exercises and stretches to help reduce the symptoms of repetitive strain injury.
Now we will go through a series of movements called “tendon gliding exercises” that help to move tendons and nerves in the wrist.
Bend your arms at the elbow so your elbows are down and your hands are pointed up toward the ceiling. You can rest your elbows on a table or on the arms of your chair, or just hold your arms in a position that feels comfortable.
The first movement is to open your hands wide, spreading your fingers. Stretch.
Now close your hands into fists and squeeze gently.
Open your hands wide again…
and then close your hands into fists.
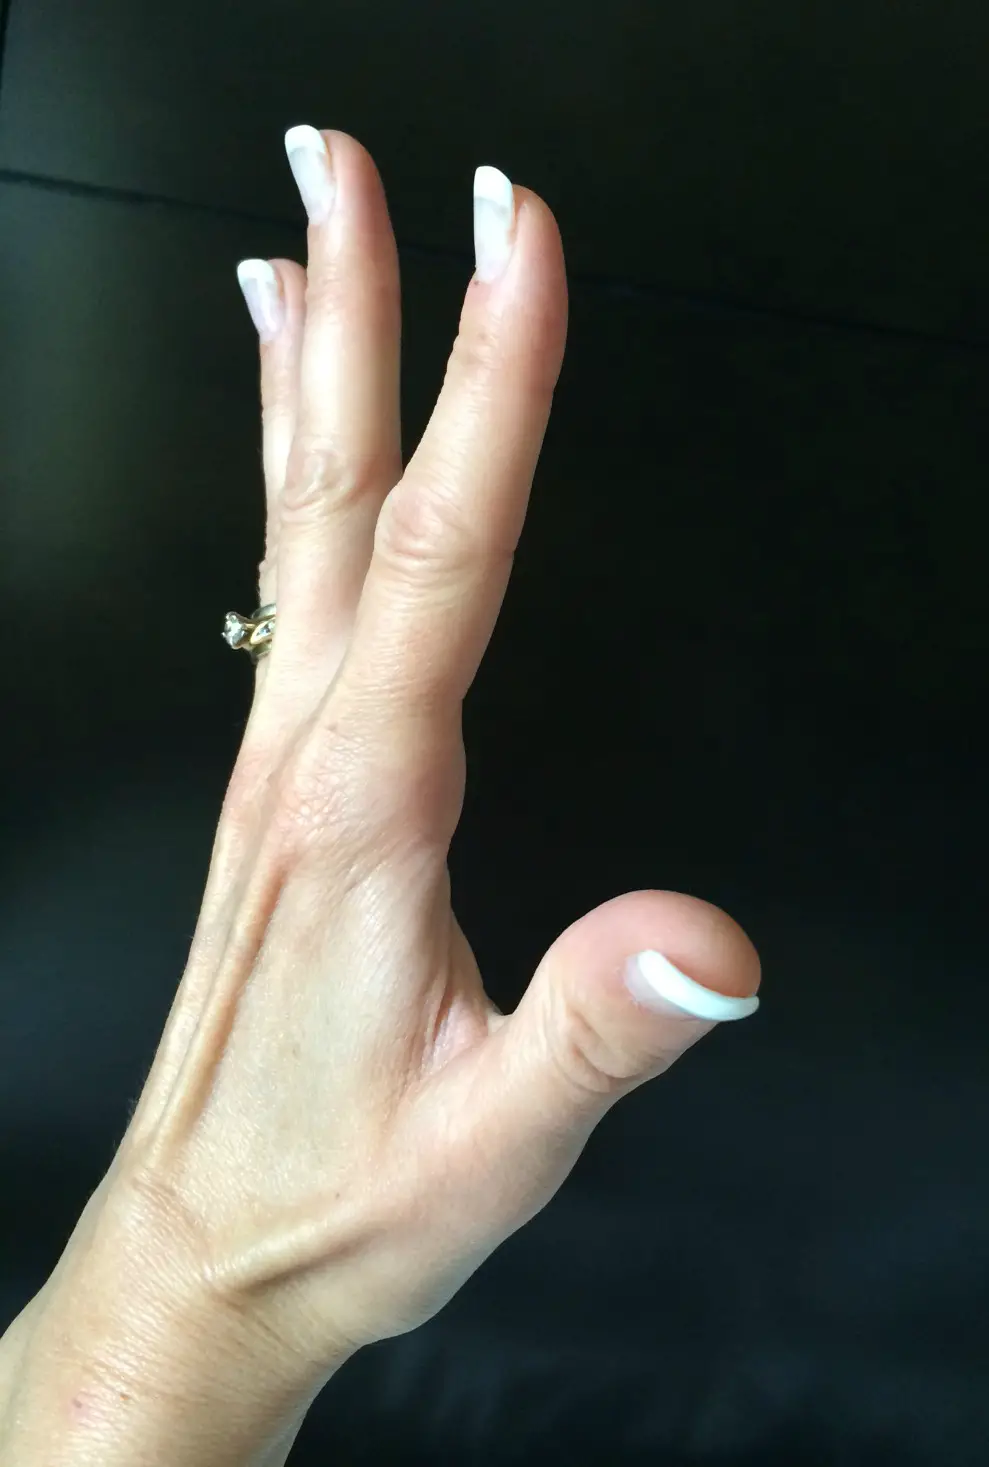
Now open your hands into a neutral position, fingers together and straight in line with your palms.
Bend your fingers into a hook position. Your large knuckles, the ones where your hands and fingers meet, should be straight, while the two small knuckles of your fingers will be bent. Your fingertips will be touching the base of your fingers. From this point forward, I will call this the “hook” position.
Now straighten your fingers and open your hands again so your fingers, hand, wrist, and forearm are in a straight line.
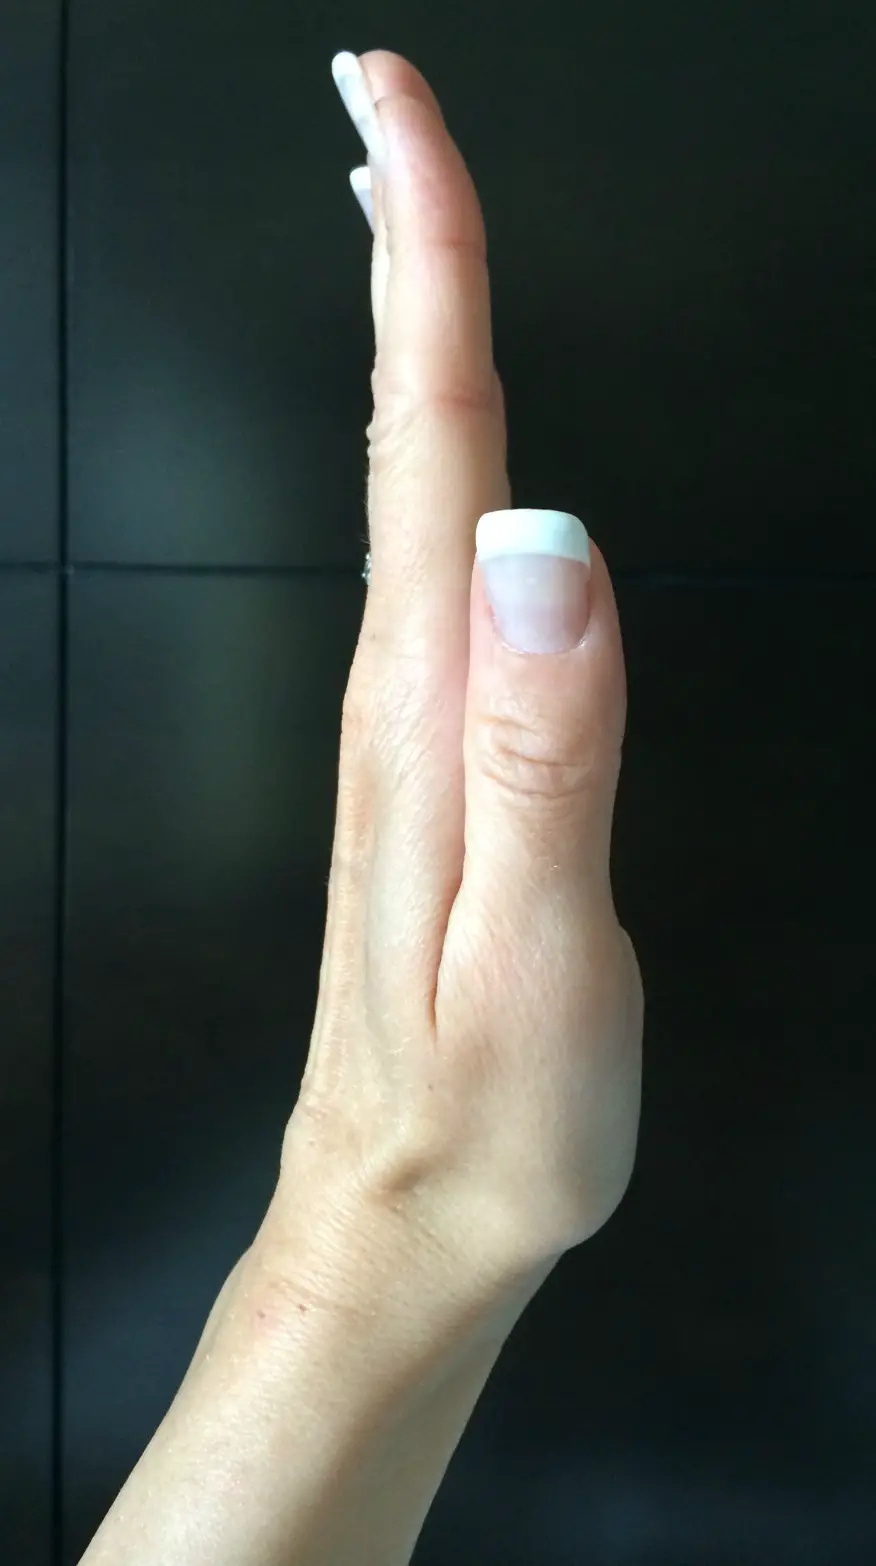
This time, bend the large knuckles of your hands while keeping the fingers straight, so your hands are in an “L” position. I will call this an “L” position from now on.
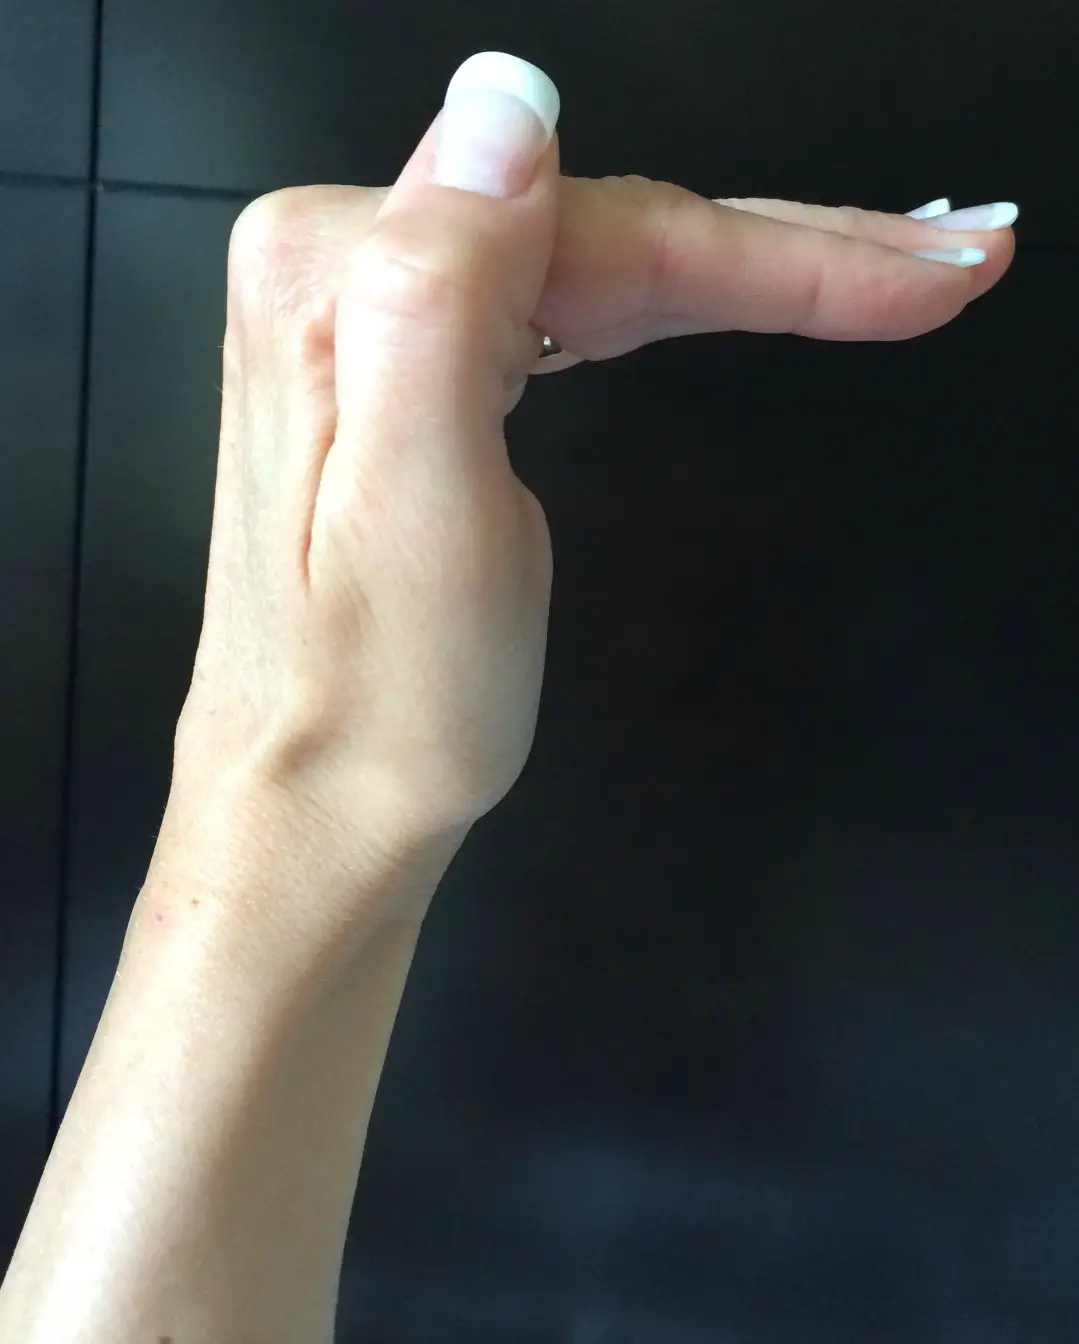
Straighten your fingers, hand, and wrist again.
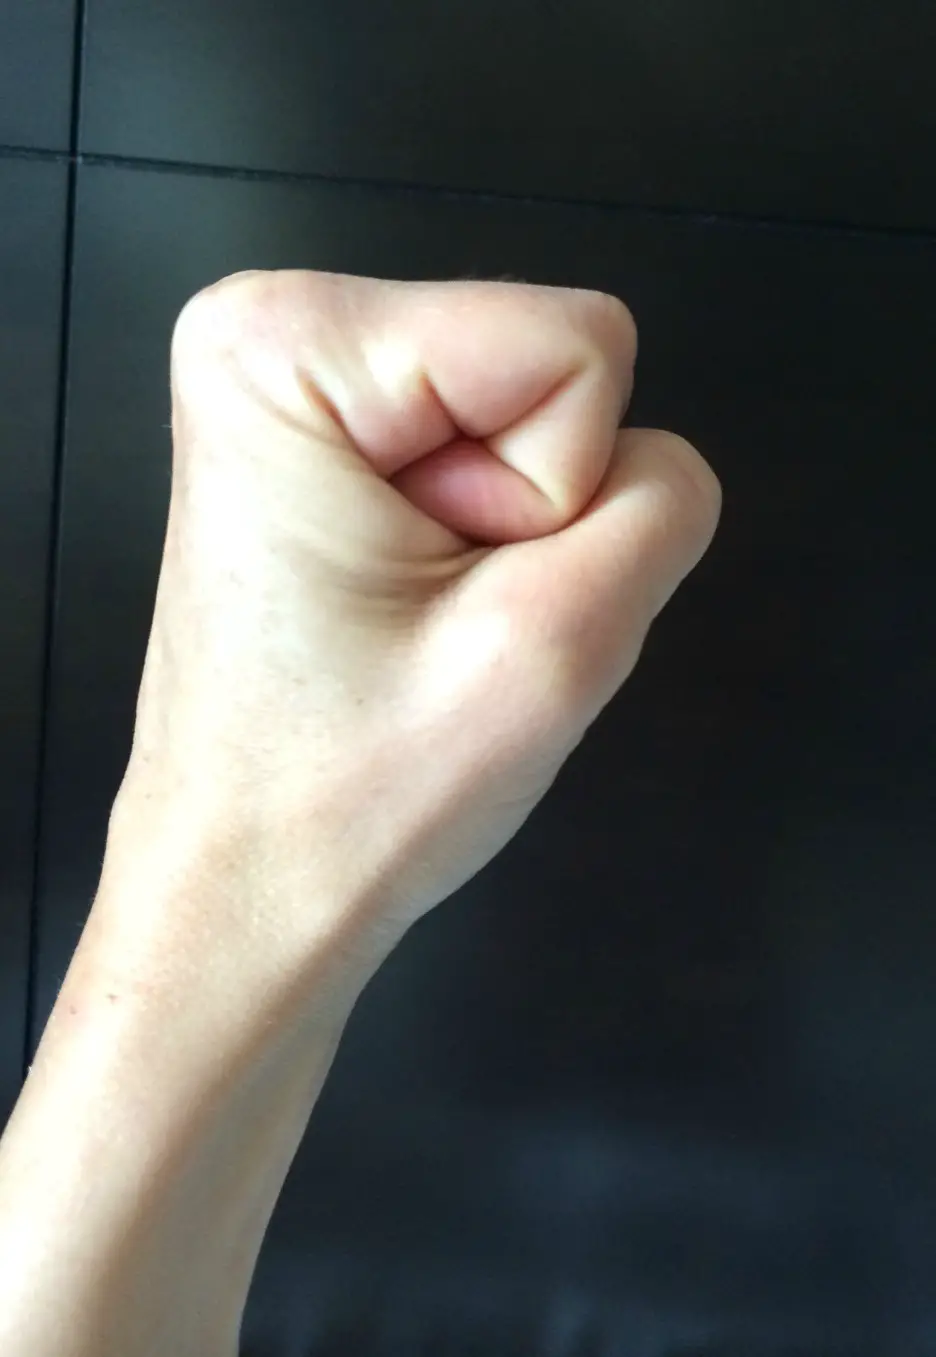
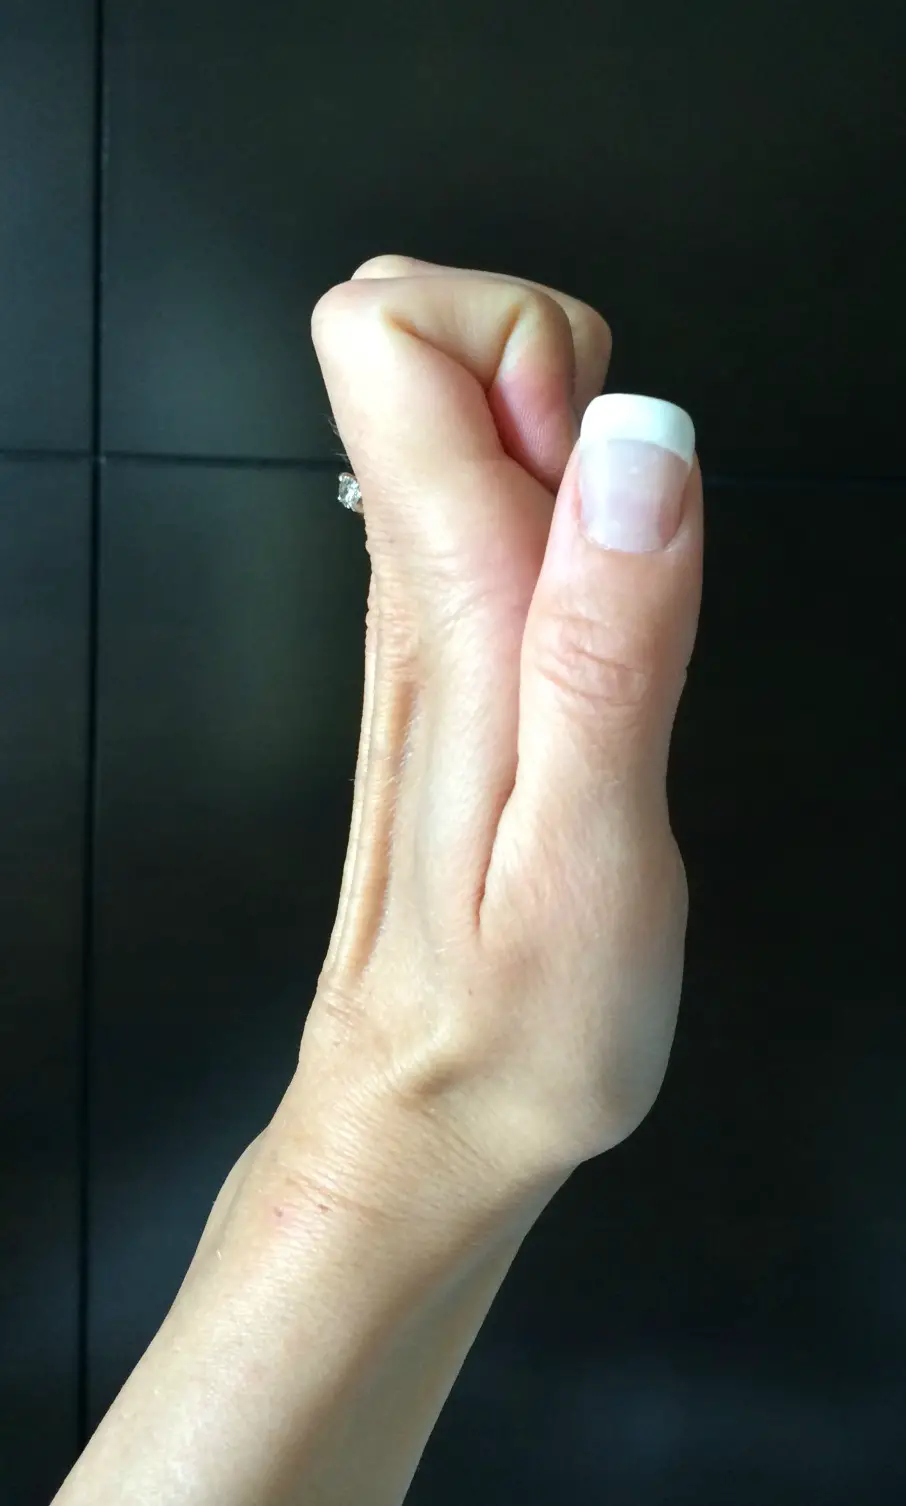
For the next exercise, bend the large knuckles and the middle knuckles, but keep the small knuckles near the ends of your fingers straight. Your fingertips will touch the bottom of your palms. Your hands will be in fists but with the fingers flat instead of tucked in. It is a fist with your fingers flat against the palm. I will call this position a “flat fist” position.
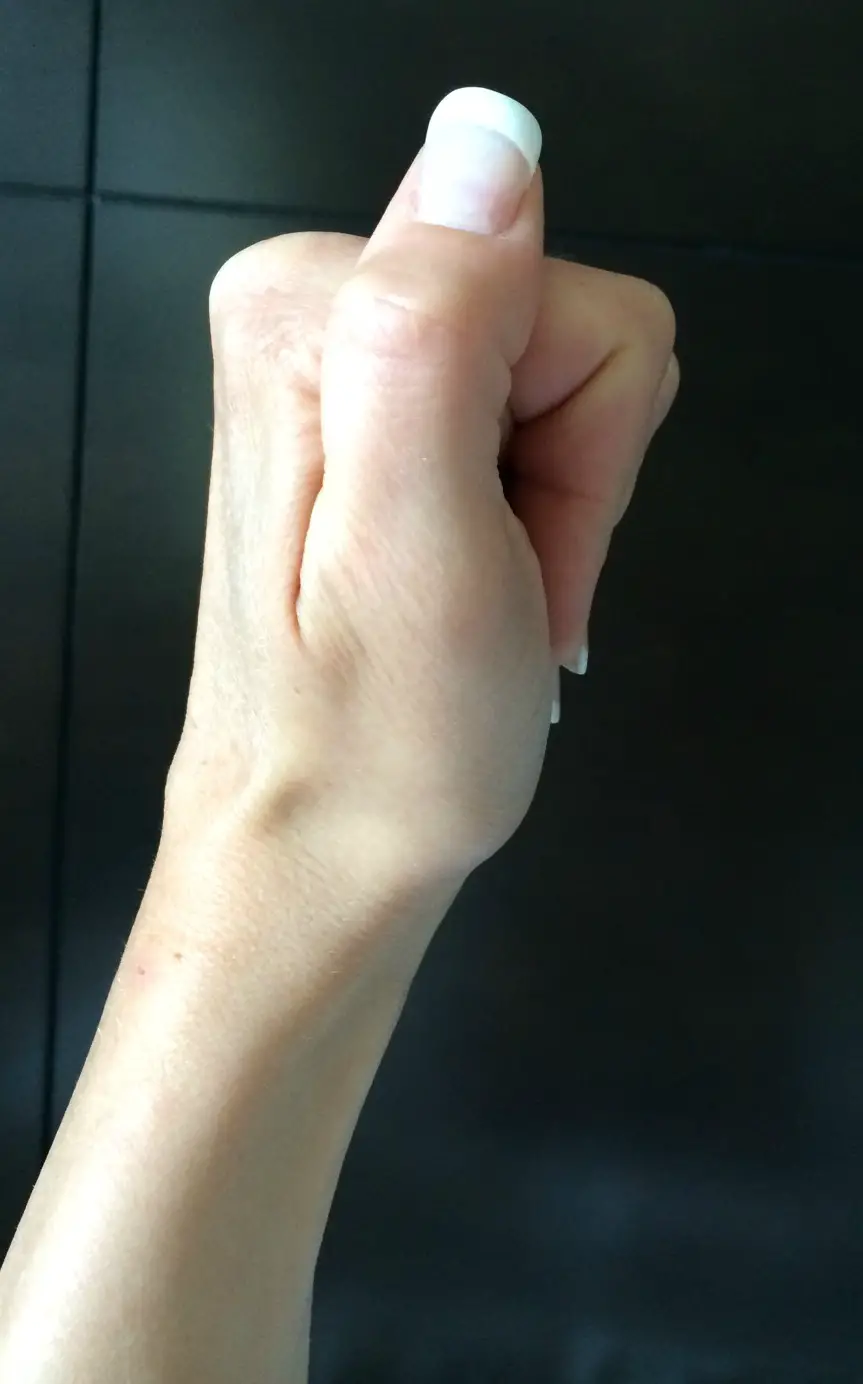
Straighten your hands.
Now make a full fist, and squeeze.
Open your hands and fingers wide, and stretch.
Now repeat the exercises, starting with a hook position. Hold this…
…and straighten the hand into neutral.
Make an L position with your hands. Hold…
…now straighten the hand.
Make a flat fist position. Hold…
…and release. Straighten the hand.
Make a full fist…squeeze…
…and now release. Straighten the wrist, fingers, and hand.
Open your hands wide, and spread your fingers in a stretch. Hold…
…and release. Straighten the hand into neutral.
Hook
Straighten
Flat fist
Straighten
L-position
Straighten
Full fist
Stretch
Bend your fingers into a hook position. Hold. Now release. Hold your hand straight.
Now make an L shape with your hands…straight fingers at a 90 degree angle to the palms…and release. Straighten the wrist and hand into neutral.
Make a flat fist…fingers flat against the palms. Hold…and release. Hold the hand straight.
Make a full fist. Hold…and release. Straighten the hand.
Stretch your hands, opening them wide. Hold this stretch…and release.
Rest your arms by placing your hands by your sides or on your lap now, and just take a few moments to relax your hands and arms. Let your arms be completely limp, as if they are strips of cloth that have been soaked in warm water. Totally limp and loose and relaxed.
Imagine that your hands are warm, and heavy, and pleasantly relaxed.
Rest for a few moments as you breathe calmly and peacefully.
(Pause)
Now let’s massage the left hand to completely loosen and relax the muscles there. Start at the base of your left hand, near your wrist. Place the fingers of your right hand along the back of your left wrist, to support it, and wrap your right thumb around the front of your left wrist. Press the middle of the base of your left hand with your right thumb, moving the thumb to the centre of the palm with steady, even pressure. Your left wrist should gently bend back a little. This gentle movement can help loosen and relax the wrist as you massage your left palm.
Repeat this a few times, moving your right thumb from the left wrist to the centre of the palm, using a comfortable amount of pressure. Now move your right thumb over to the outside of your left hand, below the little finger. Start at the wrist, and move up the palm to the base of the little finger, squeezing with even, smooth pressure.
Focus now on the fleshy part of the hand at the base of the thumb. Change the position of your right hand as needed to support your left thumb and create steady, even pressure on the muscles at the base of your left thumb. You may want to press gently with your right thumb, moving from the wrist to the tip of the left thumb, or you may want to press the right thumb in small circles over this area. Massage all the muscles at base of the left thumb, and continue to the tip of the thumb. Remember the back of your hand here, as well, massaging the entire base of your left thumb and the webspace between your thumb and the rest of your hand.
Now massage the knuckles and the part of your palm at the base of your fingers, making circles around each knuckle on the palm side, starting at the base of the index finger…then the middle finger…the ring finger…and the little finger.
Massage your index finger now, from the knuckle at the base…all the way to the tip of your index finger. Pay attention to each joint and to the area between each joint. Massage the front, sides, and back of your index finger.
Now massage your middle finger in the same way.
And your ring finger…
And your little finger.
Massage your entire left hand and wrist…anywhere you notice tension or discomfort. Start with a very light touch, gently running your fingertips over the skin of your left hand and wrist on the palm side of your hand and wrist…then on the back of your hand and wrist.
Now use the palm of your right hand to create firm pressure over the palm side of your left wrist, hand, and fingers. Switch to the back of your left hand, wrist, and fingers, moving your right palm with firm, smooth pressure.
Now use gentle pressure on the muscles…wherever your left hand and wrist need to relax. You may want to move your right thumb in small circles to massage each area.
Gently pull and move the joints, encouraging each joint to move slightly and become loose and relaxed.
Finish the massage of your left hand by concentrating on any remaining areas of tension, and massaging the areas in whatever way feels best to help the muscles relax.
(Pause)
Now switch to your right hand.
Hold your right wrist with your left hand, placing your fingers on back of the wrist, and your thumb at the front. Start with pressure at the base of your right hand, in the middle near your wrist, using your left thumb. Move the left thumb to the centre of the right palm with steady, firm pressure. Your right wrist will bend gently, leaning your right hand back slightly, to relax and loosen the right wrist muscles as you massage the right palm.
Repeat this movement, pressing with your left thumb, using even, comfortable pressure, from the right wrist to the centre of the right palm.
Move your left thumb over to the outside of your right hand, below the little finger. Start at the wrist, and move up the palm to the base of the little finger, squeezing with even, smooth pressure.
Focus now on the fleshy part of the right hand at the base of the thumb. Change the position of your left hand as needed to create even pressure on the muscles that move your right thumb and to support your right thumb. You can press gently with your left thumb from the wrist to the tip of the right thumb, or move the left thumb in small circles over this area. Massage all the muscles at base of the right thumb, and continue all the way to the tip. Massage the back of your right hand, too, including the base of your right thumb and the webspace between your right thumb and the rest of your hand.
Now massage your palm where your palm and fingers meet, making circles around each knuckle on the palm side, starting below the index finger…moving to the middle finger…then the ring finger…and little finger.
Massage your index finger from the knuckle to the tip. Include the space between each joint, and each joint itself. Massage the entire index finger, including the front, sides, and back.
Continue to the middle finger, massaging the front, back, and sides of this finger.
Massage the ring finger…
And massage the little finger.
Massage your entire right wrist and hand wherever you feel any discomfort or muscle tension. Start with light touch, moving just your left fingertips over the skin. Begin with the palm side of your right hand, wrist, and fingers. Then move your left fingertips gently over the skin on the back of your right hand and wrist.
Now press with firm, smooth, moving pressure on the palm side of your right wrist, hand, and fingers, using the entire left palm. Then use the left palm to create firm pressure on the back of your right hand, wrist, and fingers.
Now gently massage the muscles of your right hand and wrist, wherever the muscles need to relax. You may choose to use small circles with your left thumb to massage the muscles.
Gently move the joints or pull with gentle pressure to loosen and relax each joint.
Finish massaging your right hand to eliminate any last bits of tension. Massage the muscles in whatever way feels the most relaxing.
(Pause)
Now rest your hands so your hands and arms are supported. Just be still…and notice the relaxed feeling in your wrists and hands. Your hands and wrists may feel warm…perhaps even a bit tingly…totally relaxed where you have massaged the muscles and concentrated on relaxing your hands and wrists.
As you relax, allow your wrists to heal…to become healthy and free from pain and tension.
You can do these exercises whenever you need to give your wrists a rest.
Take this relaxed feeling with you as you take a few moments to wake up your body and get ready to return to your day. When you are fully alert, your relaxation activity is complete.
